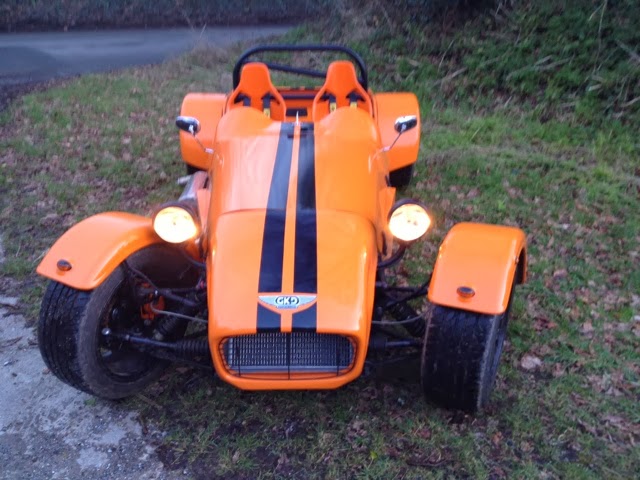
So the time came this week, when I ticked off all of the tasks on the GKD construction checklist. That was quite the milestone and very satisfying indeed!! Just two jobs left on the snagging list now, a throttle return spring and a front number plate mount.
Before getting the biro out and getting tick happy, the last few remaining jobs were to paint and then secure the top aluminium panels from the transmission tunnel and into the boot. In the end I decided to use self tapping screws to secure them (pan head, so IVA friendly) as I'm convinced that I may have to look underneath them at some point soon. If not right away as part of an IVA fix, the for basic maintenance in the future, or if (when?) I get my M3 engine, so for the time being best temporarily installed.
Last of the panels, held down with self tappers. Not also the gearstick and handbrake gaiters, installed thanks to Emma and her cunning idea of wrapping them over the existing tatty ones and saving a headache of making up loads of inserts and templates. Handbrake handle re-painted too.
At this point the Viper stripes arrived in the post, and it seemed like a great time to install them. However, I didn't pay too much attention to the width when I ordered them online, and out of the packet they were a bit wide...
Ugly...
I was determined to have some sort of stripe to break up the orange, but two was too much, and one looked ridiculous...
even uglier...
So I gave up and went home.
During the next workshop session, I finally sorted the rivnut ends which poke into the cabin, and despite being behind the seat, would have probably failed the sharp edge test. Peter sent me some M8 nut covers which were precisely and exactly what I asked for, but wouldn't stay on all the threads as they are all varying lengths on the inside. So I made up a sort of hybrid from two types of nut cover/shroud. Doesn't look very elegant, but they now securely fix and will pass the test, so that's the main thing. If they *ahem* fall off afterwards, well, I won't try too hard to put them back on.
Enthused and inspired by a few days rest I headed back to look at the stripes again. I decided that I need to see exactly what width would suit the look of the car to make an informed decision. Th 6" strips were too wide for the sleek and narrow lines of the car, but what is the goldilocks width? Queue experiments with gaffer tape ( Peter you'll be delighted to guess which type of tape)
2"" - too narrow
3"" - perfect!
And being handily half the width of the black vinyl, one cut down the middle to turn one 6" length into two 3" ones. Great. It was made to be. Only that's easier said than done, as the first attempt with a Stanley knife and a plank of 2x4 as a straight edge was not very pretty! Take two, with a craft scalpel and a steel rule was much better though.
After several videos on YouTube I decided that applying them is actually not that difficult, and very doable DIY task. Don't be put off, have a go, you will surprise yourself. Spraying soapy water on the strips and then squeegy-Ing out is the trick, and it works like a charm,
End result:
Ad then the front:
Overall I'm delighted with how that turned out, really transforms the look of the car!
So that is pretty much it - can't squeeze many more blog entries out of the build because its done! So in that case ill better look at how to get over the next hurdles then...
Hoping to take it for an MoT next week, it's insured on the chassis number now, and I have in writing from both VOSA and the insurer that its ok to take to a Pre-booked appointment such as an MoT or IVA. I hope to learn about the status of the emissions, headlights and braking, as well as having a 2nd opinion on the build quality. Fingers crossed!
quick video of the finished car, took it before I put the stripes on though
http://www.youtube.com/watch?v=fESiclezk4A&list=UUCkEXGW29NLu52DEI8kmx8A
LINK
Thanks for reading see you next time!


Hi Steve
ReplyDeleteVery, very well done - you car looks stunning, a beautiful job - now I'm really envious! I look forward to the running reports, fixes, updates, improvements, tips (I'll need them for my car)
I'd like to come and have a close look at it if you wouldn't mind, so I can pick your brains a little and get the inspiration I need to crack on with mine. Would that be possible sometime?
Kind regards
Mark
Hi Mark
ReplyDeleteThanks for your comments. Yes for sure, give me an email omara04@yahoo.com and we can arrange something.
Cheers,
Steve