Sunday 26 January 2014

Finished!!*

*well, almost...


So the time came this week, when I ticked off all of the tasks on the GKD construction checklist. That was quite the milestone and very satisfying indeed!! Just two jobs left on the snagging list now, a throttle return spring and a front number plate mount.

Before getting the biro out and getting tick happy, the last few remaining jobs were to paint and then secure the top aluminium panels from the transmission tunnel and into the boot. In the end I decided to use self tapping screws to secure them (pan head, so IVA friendly) as I'm convinced that I may have to look underneath them at some point soon. If not right away as part of an IVA fix, the for basic maintenance in the future, or if (when?) I get my M3 engine, so for the time being best temporarily installed.

Last of the panels, held down with self tappers. Not also the gearstick and handbrake gaiters, installed thanks to Emma and her cunning idea of wrapping them over the existing tatty ones and saving a headache of making up loads of inserts and templates. Handbrake handle re-painted too.

At this point the Viper stripes arrived in the post, and it seemed like a great time to install them. However, I didn't pay too much attention to the width when I ordered them online, and out of the packet they were a bit wide...

Ugly...


I was determined to have some sort of stripe to break up the orange, but two was too much, and one looked ridiculous...

even uglier...


So I gave up and went home.

During the next workshop session, I finally sorted the rivnut ends which poke into the cabin, and despite being behind the seat, would have probably failed the sharp edge test. Peter sent me some M8 nut covers which were precisely and exactly what I asked for, but wouldn't stay on all the threads as they are all varying lengths on the inside. So I made up a sort of hybrid from two types of nut cover/shroud. Doesn't look very elegant, but they now securely fix and will pass the test, so that's the main thing. If they *ahem* fall off afterwards, well, I won't try too hard to put them back on.


Enthused and inspired by a few days rest I headed back to look at the stripes again. I decided that I need to see exactly what width would suit the look of the car to make an informed decision. Th 6" strips were too wide for the sleek and narrow lines of the car, but what is the goldilocks width? Queue experiments with gaffer tape ( Peter you'll be delighted to guess which type of tape)


2"" - too narrow

3"" - perfect!

And being handily half the width of the black vinyl, one cut down the middle to turn one 6" length into two 3" ones. Great. It was made to be. Only that's easier said than done, as the first attempt with a Stanley knife and a plank of 2x4 as a straight edge was not very pretty! Take two, with a craft scalpel and a steel rule was much better though.

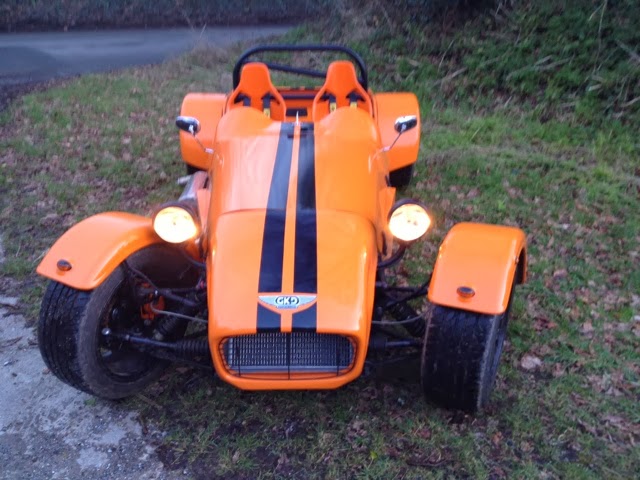
After  several videos on YouTube I decided that applying them is actually not that difficult, and very doable DIY task. Don't be put off, have a go, you will surprise yourself. Spraying soapy water on the strips and then squeegy-Ing out is the trick, and it works like a charm,

End result:


Ad then the front:


Overall I'm delighted with how that turned out, really transforms the look of the car!

So that is pretty much it - can't squeeze many more blog entries out of the build because its done! So in that case ill better look at how to get over the next hurdles then...

Hoping to take it for an MoT next week, it's insured on the chassis number now, and I have in writing from both VOSA and the insurer that its ok to take to a Pre-booked appointment such as an MoT or IVA. I hope to learn about the status of the emissions, headlights and braking, as well as having a 2nd opinion on the build quality. Fingers crossed! 


quick video of the finished car, took it before I put the stripes on though

http://www.youtube.com/watch?v=fESiclezk4A&list=UUCkEXGW29NLu52DEI8kmx8A


LINK

Thanks for reading see you next time!


Sunday 19 January 2014

Last Piece of the Puzzle

Hi Everyone

So the greatly anticipated final component has now arrived...

Any guesses what's inside?
Before we unwrap the shiny gifts, need to focus on a water leak coming from the front of the engine. It's been bugging me for some time, and I assumed it was the core plug that had corroded. Upon closer inspection I was wrong (which is a good thing, because the core plug they sent me was the wrong one anyway, think they sent the much bigger one for the back of the head). See not-very-high-quality-pic for what was wrong:


Thermostat housing - note the pink crystallised coolant around the edges.

Upon further inspection, it was actually found to be cracked. So off to GSF for a replacement - bit shocking, a plastic casting (£15) a thermostat (£15) and the o-ring and a tube of hylomar came in at nearly £50!!


Still, necessary evil. Don't think the IVA inspector would be too chuffed with getting dripped on continually during the test. Fortunately the whole job was very straightforward, the longest way home was mopping up the floor from where the coolant missed the bucket and ended up everywhere :)

So, onto fitting the roll bar. I offered it up and all seemed to be in order - another nice piece of fabrication, very impressed. However, underneath there seemed to be no way to get it centralised in the car, and avoid the nuts underneath fouling on one of the upper suspension mounts. In the end, I decided to get one side OK and worry about the other.

The "worrysome" side would then need some attention from the grinder - just taking the edges off the weld to allow the nuts to clear.

Carefully ground away a bit of the corner pieces/welds to allow the roll bar nuts to clear; without removing too much strength from the bracket
And then, hey presto it fits:


Included in the kit was the Tonneau cover I ordered - really finishes the back end off, I like it

However, few slight snags for me as I fitted the rear cycle wings level with the top of the tub. I wanted it to look flush as well as give me scope for lowering the vehicle to its lowest (arguably too low there, need to raise it up a tad) but that means I can't fit the poppers around the side. I'll need a cunning fix for that, and Emma (seamstress extroadinaire) has a few ideas, so we'll see. I might well wait until after IVA as it's not needed. Plus, knowing my luck I'll introduce another rule-breaking complication such as lethally sharp vinyl that will cut your head off or some such nonesense.

I also fitted the legally-binding contract of  "thou shalt not twiddle with the brake bias" in sticker form

Won't be touching it. Honest guv. Oh and need to stick my skateboard non-slip tread back on the clutch pedal as it appears to have fallen off
So that was the weekend's work - not bad at all. In fact, there's not too many weekends left now I shouldn't wonder!


Looking at the various lists, need to seal and secure the remaining aluminium panels and the boot floor, and that's the car 100% built according to GKD instructions. (hurrah)

On the snagging list, just a few jobs remaining, mainly IVA stuff like the odd nut cover and sharp edges, need to check the mirrors have the right field of vision (from backing it in and out of the garage I've got a nasty feeling they are too low on the scuttle), need to fit a throttle return spring as occasionally the pedal sticks slightly, and find a way of mounting a front number plate (any ideas on this? I've got a holder like on the back)

Then I'll have to book a test!! I'm thinking that in the next few weeks I'll take it for a regular MoT and they can tell me if the brake balance, brake effort, headlight beam heights and emissions are OK, rather find out that and fail a £20 MoT then the £450 test... although I'm certain failure, first time, is always an option for the biggie...

To end... Some pics of the car looking very handsome. Thanks for reading!


Wednesday 1 January 2014

New year... New car?

Happy New Year everyone. Hope you had a great festive period.

As well as eating and drinking too much, I managed a series of great performances at the workshop, and whittled the to-do list right down! A very rewarding Christmas present if I do offer it to myself.

Once more, lots of the snagging tasks, but some satisfying ones. First up, sorted the exhaust manifold out, so the lambda sensors no longer stick out and skewer unsuspecting pedestrians.

Removed the silencer and the two into one, which was very stubbornly held in place; and created recesses for the lambda sensors to sit


Reinstalled, all looking much smarter now.


It has had the fortunate (or unfortunate, depending on your viewpoint) effect of moving the silencer back in, so I'll have to re-do the rear bracket again. More on that when I get the seats out.


Next job, throttle cable. I've never been completely happy with just having a square hole in the aluminium bulkhead, and it's been causing routing issues and kinking the cable causing the throttle to stick, and others have had cables snap due to fraying against the sharp corners of the square hole. So, back to the drawing board then. 

After a bit of thought, some inch box section, and a bit of MIG wire, I  came up with this:


Then painted and installed in the car


It worked rather well, if I do say so myself. What you can't see is a nylon block inside, preventing any fraying on sharp edges. I did have a bit of fine tuning to do as the cable was still a bit taught and causing a high-ish idle. After cutting a sliver from the end, got a bit of slack in the cable and a healthy low idle. This has had the extra bonus of making gears easier to select - methinks the 1500rpm idle was causing the clutch disc to spin faster and making it harder to engage. Once more, another noticeable improvement, might eventually get a decent clutch on this car in the end!

There is still some friction in the cable though, so might need to add a second throttle return spring to assist in closing the throttle - the routing in the kit car is obviously different from that in the E36 and causing extra friction.

Anyway, next job... Christmas! Hurrah. Some great presents that will help with the project! A helmet and some racing booties so I don't press all 3 pedals with one foot...


After the festivities, back onto the project. Made a coup,e of brackets to hold the BMW loom holder - aside from some minor cosmetic cable tying (for neatness rather than necessity) the engine bay is now complete:


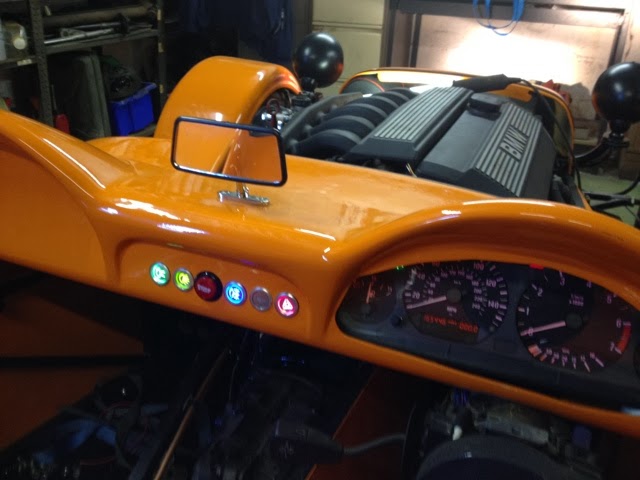
Then, installing the savage switches into the dash, which is tricky as I don't think I left enough slack on the tiny cables. One of the future improvements might be to make that into a longer wire and a single connector multi-plug. OK for now though:


I also trimmed and re-painted the steering shroud, fitted here:


Plenty of other snags ticked off, but not really worth photographing or writing about. However, one that was, the seats.

I was never really happy with the rear sides of the seats, very poorly finished with dry mat, sharp edges, and a thin wash of colour...


So I re - gel coated them in black... (Left new, right old)


And left hem both freshly gelled, drying 


Might take some time to fully cure, ambient temp is quite low at the moment.

So then this last flurry of work saw the cockpit all but finished - most of the panels are now silicone sealed and fully riveted, and put the seatbelts in place


So, a very productive break all told. For anyone who is worrying, don't, the skirting boards in the kitchen were done as well, and starting tiling next weekend :-)

That is about as far as I can go for the moment - All I need now is the roll bar - which has been made, just need to get Peter to find a massive Jiffy bag and a shed load of stamps :-)

Once that arrives, then I really will be on the home straight; should be able to start filling out IVA application forms in the next few weeks.

Thanks for reading! We are getting close now....