Wednesday 18 December 2013

Magazine Superstar

Another brief update...

One idle Sunday, recently, whilst I was stood in WHS Smiths waiting for my good lady to hurry up and get served, I happened to pick up Complete Kit Car from the nearby shelf and flick through - to my surprise, I was in it!!!

Signed copies available upon request
I remember having a chat with the editor, Ian Stent at the Exeter show; and he mentioned that he would be keen to include it in the mag in some form, and potentially run a feature when finished. I had forgotten all about that and the amount of photographers that were cooing over it on the day, so it was a nice surprise and a bit of reward for all the hard work. I were dead chuffed I were.

Leave me a comment below if CKC brought you here :)

So, back to the business of building...


After the show, and as per the last update, attention has continued to focus on all the small and menial but no less important tasks. I spent a whole evening on eBay ordering "finishing pieces" like clips, rubber edging, nut covers etc. and many an hour on tidying and finishing tasks like pegging back looms, routing wiring, securing pipes with cable ties etc.

I have also been nagging Peter (who has been very patient) about the few remaining electrical gremlins. First one, headlights that flash on and off with the indicators. Go on... see if you can spot the deliberate mistake...
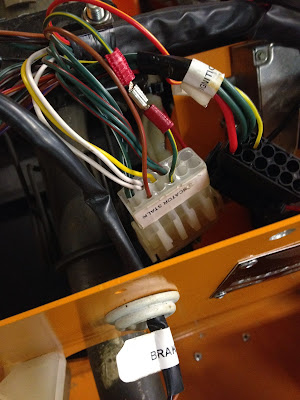

Don't cut the yellow wire! or the red wire! I think it's the white one... BOOM.

That's right, you guessed it. I cut the wrong wire. Peter gave me some instruction over the 'phone but I cut and joined the wrong yellow and green wire (the one with the spade terminals in that picture) I should have cut the OTHER yellow and green wire. D'oh, and apologies to Peter who spent a fair bit of time wracking his brains only to find it was yet another foolish customer mistake!!

Also managed to fix the hazard tell-tale flashing in time with the right indicator, this was just a simple snip and re-solder. So now, everything works 100% perfectly. Right down to the buzzer that tells you when you have left the lights on when you take the key out!!

I sorted out my dilemma with the petrol cap tethering - seems you can simply trap the wire between the filler neck and hose and clamp in place with the jubilee clip. So simple and effective.... why didn't I think of that! I had started fabricating all sorts of weird and wonderful clips, brackets, jointing pieces etc.

The roll-bar/hoop is also ready and being posted down to me, along with a tonneau cover for the boot. I hadn't planned to fit that yet, but might do as it will neaten up the back area for IVA (even though they will undoubtedly make me take it off).

So progress-wise, about 94% through the build list - the big things remaining are roll bar, seatbelts and re-re-re-fitting the ally panels for about the 7th time (getting to the stage where I wish I'd have rivnutted them or tapped them by now!!) But this is the last time now... or so I keep telling myself every time I end up drilling a load of rivets out!

The snagging list, which is running parallel with the build list now, is at about 70% complete, with mostly minor jobs left such as nut covers, sharp edge patrol, and need to flip the exhaust three into ones as they're upside down.

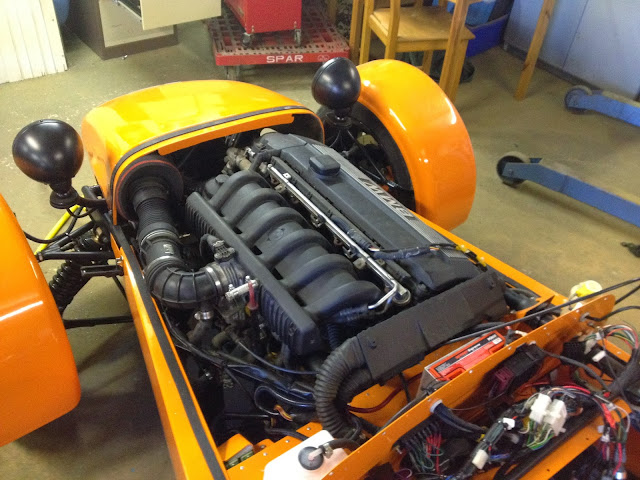
I forgot to include this pic last time, which shows the engine bay nearing completion in terms of neatening up wiring and pipes etc. Oh and the now-fitted PiperX air filter, complete with Land Rover rubber air duct hose part number ESR1611L HOSE AIRFLOW TO PLENUM V8 DEFENDER RANGE ROVER CLASSIC, £23 +vat from Brookwell.co.uk,


Getting close to finishing now! Will seriously be looking at filling in the IVA paperwork after Christmas.

Thanks for reading, and Merry Christmas if I don't see you before!

Monday 2 December 2013

Update of menial importance

Hello dear blog readers

Just a minor update covering a few jobs I've ticked off recently. Unfortunately it's that stage of the build  where all the tedious and necessary jobs are screaming out for attention.

Ty-wrapping looms and cables seems to have occupied my time of late. Boot area is done though

Fuel filler and vent in place as well.

The main loom up through the car and the engine bay is also similarly neat. Beneath the scuttle is still a bit of a bird's nest, but I've uncovered a few interesting features with the wiring that need sorting out, hence can't tie it all up yet - headlights that flash in time with the indicators and stuff like that. Nothing too disturbing, but need putting right. Peter has been very helpful and the problems seem to stem from updates required to the loom from IVA such as foglight changes and the fact I've gone for all-round LED indicators etc. Peter is working tirelessly on a solution, and has boffins on it around the clock!

I also changed out the aluminium hose joiners that failed. As you can see, it's no wonder why

Old left, new right

I then fixed the rad fan which was catching something .... A piece of cardboard used to protect it during shipping. Remove cardboard, easy fix.

All this work dismantling the cooling system may mean I have to bleed it again, as it seemed to be getting too hot the other day - probably got an airlock in there.

Other minor jobs include - VIN plate and stamping chassis number onto chassis, rectifying assorted pop rivets that were missed, making brackets for all manner of things like diagnostic plug etc, fitting the nose cone properly, safe edging and IVA nut covers, wiring up dash switch for horn etc. All done, not really worth a photo, and as its colder now (about 5°C up the workshop) the iPhone camera has started doing its usual trick and playing up so fewer pics this time :-(

So that leaves us 94% complete on the build list, and 62% complete on the snagging. Last big component remaining is the roll bar, which Peter has, just need to get it. That will then allow the seats and seatbelt a to be fitted, the remaining ally panels, and then it can be prepped for Pre-IVA MoT and soon after IVA!! Great stuff.

Pic as of yesterday:


Thanks for reading

Sunday 17 November 2013

Let there be light

Hello again.

So after a few weeks of no progress due to various other things (Land Rover MoT, picking up a new/old Morris Minor from the other side of the country, various shopping trips etc) it is now my pleasure to report some further advances on the Legend project.

Earlier I reported an unhappy feeling clutch pedal. I set to replacing the slave cylinder as that was the only other thing in the system it could be. Using the trailer as a handy ramp: 

Slave cylinder out

A photo of what you can see inside the bell housing - all seemed well, no big fragments of clutch hanging out etc 


After replacing the slave and bleeding the system again, the result was... Much the same as before. Very disappointing. It was perhaps ever so slightly improved, and I'm beginning to think the slave was actually OK, and it's either air trapped somewhere in the system, or the clutch disc having rusted into the splines and impeding movement. So, will keep trying, fiddling, bleeding etc until its fixed or I get bored.

Onto more satisfying things then. Decided to bite the bullet and begin the process of getting lights working


First up, reverse light because it was relatively easy. The number plate light next, although slightly trickier because I had to drop the fuel tank, as can be seen in the pic. A bit annoying, but it had to come out anyway so I could tinker with the brackets to get them to fit nicer. Tinkering done, put everything back and then there were 2 lights.

Next job, ordered and fitted a PVR25 race battery from Powervamp. Very nifty and tiny little battery that really packs a punch! Well impressed with the power for such a small and light battery, turned the big 2.8 lump over well. Although during all the playing with light wiring it dropped from 12.7 to 12.1 V in a few hours. Have to be carful about that. 


I can now start to tidy up the engine bay wiring. Before that though, I finished the light wiring.

Switches first, bit fiddly due to the size of the connectors, and I'm not sure how I will be able to get them on when the scuttle is in place, but working for the time being


Love the colours!


 Then onto the lights themselves. A few gremlins to sort out, all my own doing though. One pin I assembled wrong in the main loom caused a brief headache with the brake lights, and the fog light polarity was reversed, and a spade connector not quite making a good earth... But all easily fixable once traced. Then finally, all the lights were functioning. 


Looking good good! The LED rears look amazing. Very happy with them. All the tell tales, new push button fog light that cancels with the ignition off, and dashboard lights work as well.

Two slight anomalies in that when you pull the indicator stalk to momentarily flash, it activates the indicator flasher and flashes the headlights on and off... Most bizarre, but I don't think it will affect the IVA; and the hazard tell tale flashes with the right indicator and not the left. Again, hopefully not an issue but percliar nonetheless. Could be an earthing issue, or perhaps the indicator stalk developing a fault. 

I also fitted the fuel tank filler hose I bought at the show, but forgot to take a pic of that.

So now the queue of "other" vehicles requiring urgent repairs is thinning out, I might be able to get back on and focus getting the legend ready for IVA. The end is very much in sight. I also took Dave's advice and got a letter from VOSA to clear me taking the car for a Pre IVA MoT, which I plan to do as soon as the car is roadworthy. The snagging list is both increasing and decreasing a the same time. I look forward to the day when it's only decreasing!!

Thanks for reading. 


Sunday 27 October 2013

The show did go on!

Welcome back. So you'll no doubt be delighted to hear the car made it to the show, and was the belle of the ball!

There was a last minute dash to get a few things on Friday, car covers, extension leads for the trailer lights etc but it all came together in the end and we towed the legend up using the disco on Friday night after work.

When we arrived, after unpacking from the trailer, it would have been rude not to take it for a little spin! It was also the the first time it's ever been driven faster than about 10mph, so clearly I was itching to out some miles on. Unfortunately the weather came in pretty rotten, and Emma got fed up of the gravel and drizzle shower effect...


 So then we put it on the stand


Lookin good! Especially after Peter Lathrope master valeter gave it the once over


Next day saw a lot of interest, and I had some really great feedback and some nice comments. Very rewarding experience! Certainly makes the effort worthwhile.

Peter was also jolly kind and gave the car a once-over from an IVA point of view. I've now got a big list of things to sort!! Nothing too major, mostly finishing bits like sharp edges that need tidying, wishbones are back to front, and the exhaust is upside down (lambda sensors poking out) see Peter... Told you I would 'fess up to my lovely blog readers!!! (He bet me I wouldn't own up to you guys)


One very proud owner!

The show itself was quite good, although not the best it's ever been - recession might be taking its toll on people's disposable income, hope for the industry's sake it picks up again. Got a few tools, few bits to finish the car with, and a few of the kit car mags semi-interested in doing a feature on my car. Plus it was good to see Peter again and have a good old natter. What that guy doesn't know about these kits, isn't worth knowing!!

He even very kindly corrected my dodgy panel beating and made it look neater on the edges.


(The master at work)

Everyone loved the colour too, which I was obviously delighted about.

As Emma had other things to do, Day 2 Trev accompanied me and we both had a good nose around. Saw some interesting things, some completely bonkers things, and a few nifty ideas. Quite like a motorbike intercom thingy with Bluetooth and MP3 playback that goes inside a race helmet - might ask Santa for one...

So then , late on Sunday, the time came to pack up. Sight panic when the car didn't start, although later realised that was just a wire we'd unplugged to neaten the engine bay. Easily resolved, I like those fixes. Time for another blast around the outside and car park, well it would be rude not to whilst I could!


 Shortly after that one of the rad hoses popped off and sprayed coolant all over the front of
the car. That was the end of the fun for that day! I'm glad it did, as I'd wanted all the
weaknesses to come out in the relatively "safe" environment of having the car trailer
just yards away.

Unfortunately this has also highlighted that this particular 328 engine is perhaps not the best.
It hesitates quite badly, is misfiring at low rpm, and was only doing 0-60 in around 6 or 7 seconds. Zippy it might be, but not fast. We all know what that means then, time to save up for an M3 engine :-)

Arrived back safe later that evening, despite this "monster storm" making its way across the south coast.

Great weekend, just need to finish off the last few jobs and then start to think about IVA!!

Thanks for reading...


Monday 21 October 2013

The Show Must Go On!

Hi and welcome back.

It's been a very productive week / couple of days and happy to report that essentially the car is about ready for the big show.

I took a conscious decision to finish the cosmetic bits, basically everything that people will see, so getting the scuttle, bonnet, nosecone sorted etc.

Painting first, in the end I bottled out of doing it in my garage because the temperature was very "hit and miss" and It was too great a risk. A mate of mine let me into his work after hours, they have a fully functioning spray painting booth, so I utilised that for the usual fee ( up to 5 packs of chocolate digestives in case you're keeping score). He was very keen do it for me.... and whilst it would have bought me some extra time, I was adamant that I would be doing everything on this car, so I'm not going to wimp out at the last minute! Glad I did, because this is some of my best work yet, and the nose cone turned out acceptable in the end. 

First thing I did was chuck them all on the car...

Very orange! Might need to tone that down, but I have a cunning plan to add a bit of black contrast to it... Watch this space


Also note the new rear lights, in their final position, albeit not wired up.

Next job, install nose cone. Fairly easy as I'd Pre-drilled the holes. Just bent the tabs back and job done


Then turned attention to fitting out the scuttle. Instrument panel first


The foam doesn't half make a mess, it gets everywhere, but I suppose you won't see it. 

After that, the rest of the shiny bits


Ended up with a bit of a gap underneath the instruments, which I'm not too happy about, so will need to find some way of filling / sealing that doesn't look too naff.

I did start to try connecting up some of the switches at that point, but promptly blew a fuse and decided it wasn't worth rushing and it can wait until after the show.

I used rivnuts on the upright face of the scuttle and attached that to the ally bulkhead.

Finally, bolt all the panels in place and grace the nose with its glorious badge, hey presto- ready for the show!


Next couple of days, the focus shifted to making sure it goes on the trailer and can be secured, trailer lights working, sourcing a car cover etc.


Had to use a bottle jack on the ramp to get the exhaust to clear, but apart from that it drives straight on and off, which is ideal. The trailer was a sound investment.


Tied down and ready to go...


So we're pretty much ready for the show now and about 86% complete overall! And as a happy coincidence, the remaining jobs to completion aren't that much - wire up lights, roll cage and seat belts, riveting the transmission tunnel together, tidy up wiring and fix the air filter in place - and that is pretty much it! (Pesky clutch notwithstanding)

It's crept up quick, but might need to think seriously about IVA now....

Thanks for reading


Sunday 13 October 2013

Cycle wings sorted, bending bonnet...

So this week, in case you were wondering where the cliff hanger would take you... I went for the "sorting the fibre glass" bits.

I started by fitting the cycle wings proper:


Both fairly straightforward, although the wing piping on the rear was a new and interesting challenge. Think I got the best of it, although at the top I need a larger profile piping as it doesn't quite fill the gap. That's a "tomorrow job" though. Good enough for today.


(The rag is for decorative effect)

Next up, starting to fettle the scuttle. Earlier in the week I knocked up a quick drawing and printed it 1:1scale, which proved the perfect template for drilling:


Holes drilled, buttons fit nicely


(The missing one is for a horn which is on order - don't want to have to rely on the steering wheel button, as the plan has various options for steering Pre and post IVA, some for which may or may or may not have horn buttons etc.)


Mirrors next:


(Cheesy grin reflected back : check)

And so, the next big task would be sorting the bonnet, but that would have to wait until the weekend.


I was cautious about this step, after all you only get one shot at this! And it's incredibly visible once done.

I sought lots of advice, and the best seemed to come from Peter, who told me about marking datums for the radii, and then utilising cylinders of appropriate diameters for the scuttle end and nose cone end. Well, here goes nothing...


(Use of large CO2 bottle at the nose cone end)


Seemed to work exceptionally well, big thanks to Trev for the extra pair of hands and helpful suggestions - both of which were testament to the overall successful result.


(Trev's grin summarises the success of the moment - looking good)

A few more tweaks, bends, dressing with the file, and fitting the bonnet catches ( and removing the horrendously sticky nitto Dento tape... Glad to see the back of that stuff!) and the result looks like this:


Delighted with the look so far.

So Sunday was about painting these bits.

Unfortunately that didn't go quite to plan, as I was running behind time, and decided that using an air-powered sander would speed things up. ( Each and every single panel I had rubbed down by hand previously, very tedious and labour intensive). However, as I found afterwards, the sander tended to scuff and "chatter" at the surface, rather than smoothly remove material. So unfortunately it ruined the surface of the nosecone :-( and I didn't realise until I had blown the dust away from the very last section. This meant me having to do the whole thing again, by hand, with a coarser grit sand paper and work up, through various grades and guide coats of satin black. Instead of saving time, it actually cost me about double, which is incredibly annoying to say the least! I finished up by getting some primer on, but still not sure whether I've successfully covered up my error. Oh well, time will tell. Best invest in shares in a body filler supply company before the next blog post...


Doubt the photo shows it, but this is the nose cone towards the last few coats. I've optimistically put quite a few coats on (6) in the hope it will rub back smooth


The motivation to get the painting finished is driven by the weather- now its October it is getting colder all the time. Even today, at ambient temperature of 15°C it was taking far longer for the primer to go off, about 30-40 minutes, whereas in the height of summer at 23°C it was no more than 10mins. I think there's about another 2 weeks left before it gets too cold to spray, and you start getting weird effects like blooming and crazing/cracking. So fingers crossed I can get it done in time!

To add to the misery, whilst the primer was drying I drove the car around the yard a bit, it was running really rough. First problem was of my own doing - took the air filter and MAF off to fit the bonnet,(d'oh) after re-fitting the MAF and vacuum pipes it settled down a bit, but still was lumpy and misfiring. Oh and the clutch is still iffy.  Humph.

So, still lots to do. Against the original list of jobs, I'm 81% complete, but the snagging list is presently growing!!!!

Check back next time and hopefully there will be more fortuitous tales to be told. Still having a wonderful time though, and the light at the end of the tunnel is definitely visible. It's true what they say - the worst day in the garage is still better than the best day at the office!!